|
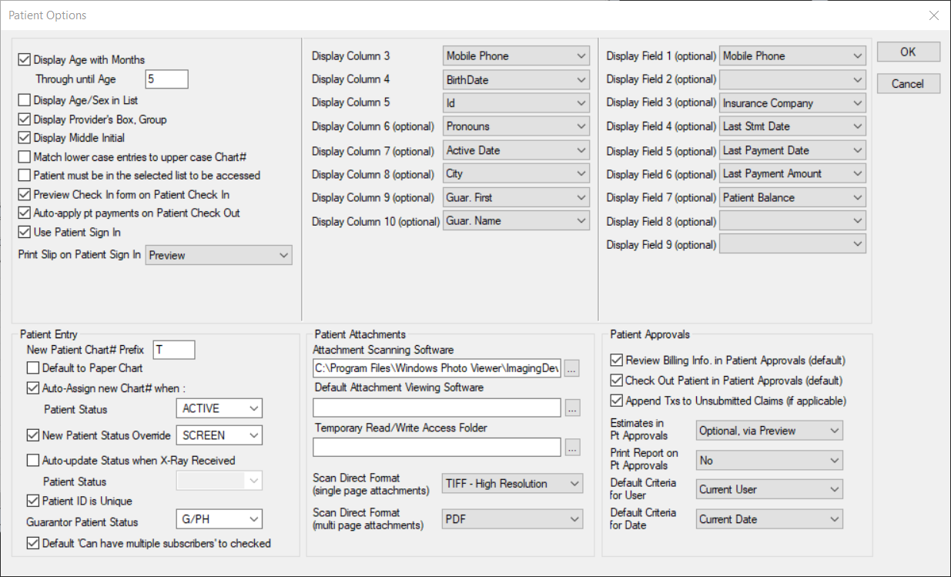
If you have the necessary access permissions, you can customize the way the Patients module displays on individual workstations to suit your preferences. Configuration is accessible from the Patients or Patient Card window > Options/Settings ( ) icon > Patient Options window. ) icon > Patient Options window.
Note: To see the effects of your changes, close and re-open the Patients module.
 General fields General fields
| Display Age with Months Through until Age
|
If the checkbox is selected, the patient’s age in additional months displays next to their age and name in the search results.
Example: Jones, Martin (M3y5m)
|
|
Display Age/Sex in List
|
If the checkbox is selected, the patient’s sex and age display in the search results.
Example: Miller, John (M57)
|
|
Display Provider’s Box / Group
|
If the checkbox is selected, the assigned provider's group name displays in the search results.
|
|
Display Middle Initial
|
If the checkbox is selected, the patient’s middle initial displays as part of the patient name in the search results and the selection list.
|
|
Match lower case entries to upper case Chart#
|
If the checkbox is selected, your search criteria is matched to upper case chart numbers when searching in the Patients module.
|
|
Parent must be in the selected list to be accessed
|
If the checkbox is selected, the patient's name must be in the selection list to access their record.
|
|
Preview Check In form on Patient Check In
|
If the checkbox is selected, the Check In form auto-opens when a patient checks in.
|
|
Auto-apply pt payments on Patient Check Out
|
If the checkbox is selected, any unallocated payments are automatically applied at check out instead of during the overnight process.
|
|
Use Patient Sign In
|
If the checkbox is selected, the Patient Sign In right-click option is enabled in the selection list.
|
Print Slip on Patient Sign In
|
Displays the print option for a patient sign in slip.
Note: This field is related to the Use Patient Sign In checkbox.
|
|
Display Column 3-10
|
Indicates the column headers that display in the search results after Name and Chart #.
Note: Columns 6-10 are optional.
|
|
Display Field 1-9
|
Indicates the information that displays in the Patients module > patient information area after the patient names, address, and age.
Note: All Display Fields are optional.
|
Patient Entry fields
|
New Patient Chart# Prefix
|
Displays the prefix letter used when a patient chart is added.
|
|
Default to Paper Chart
|
If the checkbox is selected, all new patient records default to select Codes tab > Paper Chart checkbox.
|
|
Auto-Assign new Chart# when: / Patient Status
|
If the checkbox is selected, users are asked if they want to auto-assign a new Chart# when a patient is given a specific status.
If the checkbox is selected, this displays which patient status triggers the prompt.
Example: A screening patient could have a temp chart, and when they are given an Active patient status, they need a new, official chart number.
|
|
New Patient Status Override
|
If the checkbox is selected, all new patients registered on this workstation will have the status displayed in the drop-down list.
|
|
Auto-update Status when X-Ray Received / Patient Status
|
If the checkbox is selected, when an x-ray, radiograph, or image is received, the patient status automatically changes the patient status to the displayed status.
|
|
Patient ID is Unique
|
If the checkbox is selected, all Patient IDs must be unique in axiUm.
Note: The ID is set from Patient Info > Personal tab > ID field.
|
|
Guarantor Patient Status
|
Displays the patient status assigned to a guarantor when they are assigned to a patient.
|
|
Default ‘Can have multiple subscribers’ to checked
|
If the checkbox is selected, the Insurance tab > Can have multiple subscribers field defaults to selected when entering a new benefit plan.
Note: A single-person plan must have the checkbox deselected when adding the plan.
|
Patient Attachments fields
|
Attachment Scanning Software
|
Displays the path to the scanning software .exe file.
Note: The software creates files that are attached to the patient record.
|
|
Default Attachment Viewing Software
|
Displays the default Attachment Viewing Software file.
|
|
Temporary Read/Write Access Folder
|
Displays the path to axiUm’s temporary folder.
Notes:
- axiUm users must have full access to this location.
- If not specified, axiUm will display errors when trying to do some tasks such as view Crystal Reports.
Tip: This path can also be specified from Info Manager > Setup button.
|
|
Scan Direct Format (single page attachments)
|
Displays file type options for how single page documents will be saved when scanned directly into axiUm:
-
JPEG
-
TIFF – High Resolution
-
TIFF – Medium Resolution
-
TIFF – Low Resolution
-
PDF
|
|
Scan Direct Format (multi page attachments)
|
Displays file type options for how multi-page documents will be saved when scanned directly into axiUm:
|
Patient Approvals fields
|
Review Billing Info in Patient Approvals (default)
|
Select the checkbox to default the Patient Approvals window > Billing Info checkbox to selected.
|
|
Check Out Patient In Patient Approvals (default)
|
If the checkbox is selected, the Patient Approvals window > Check Out Patient checkbox is selected by default.
|
|
Append Txs to Unsubmitted Claims (if applicable)
|
If the checkbox is selected, treatments are appended onto the same batched claim when the treatments are unsubmitted and unevaluated.
Example: When a patient is seen in two clinics in the same day, and different faculty members approve the claims.
|
|
Estimates in Pt Approvals
|
Specifies how estimates display in the Patient Approvals window.
|
|
Print Report on Pt Approvals
|
Displays preview and print options for reports after patient approvals are completed.
- No: If set, there is no action after the user completes the approval.
- Print: If set, the report prints automatically without a preview after the user completes the approval.
- Preview: If set, the report preview window displays automatically after the user completes the approval. The user can choose to print the report after previewing it.
- Preview then Print: If set, the report preview window displays automatically after the user completes the approval; when the user closes the preview, the report prints automatically.
|
|
Default Criteria for User
|
Displays the default user setting when opening the Patient Approvals window from the status bar.
Reminder: When the Patient Approvals window is accessed from the Patients module, Current User is always selected for providers and All Users is selected for non-providers.
|
|
Default Criteria for Date
|
Displays the default date setting when opening the Patient Approvals window from the status bar.
Reminder: When the Patient Approvals window is accessed from the Patients module, All Dates is always selected.
|
|